Introduction
When the chilly winds usher in the colder months, there’s nothing quite like a cozy scarf to keep you warm. The crochet keyhole scarf is not only functional but also adds a stylish touch to any outfit. This pattern is perfect for crafters of all skill levels, from complete beginners to seasoned crochet enthusiasts looking for a quick and satisfying project. In this guide, we’ll dive deep into the materials needed, step-by-step instructions, and some tips to make your scarf truly unique.

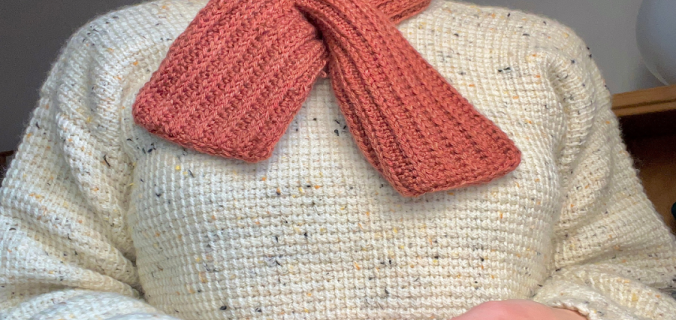
What is a Keyhole Scarf?
A keyhole scarf is designed with a unique opening that allows one end of the scarf to slide through the other. This not only adds an interesting look but also ensures that the scarf stays securely in place, making it a practical accessory for those blustery days. With its minimalist design and bold stitches, you can create a stunning piece to wear or gift.
Materials Needed
Before we get started, let’s gather all the materials you’ll need for this project:
- Yarn: Choose a medium-weight yarn (worsted weight) for a cozy scarf. Wool, acrylic, or a blend are all great options. Aim for about 200-250 yards, depending on your desired length.
- Crochet Hook: A size H (5.0mm) crochet hook is ideal, but you may want to adjust based on your yarn and tension.
- Scissors: For trimming your yarn.
- Tapestry Needle: For weaving in ends.
- Tape Measure: To measure the length of your scarf.
- Stitch Marker: Optional, but helpful for keeping track of stitches.
Basic Crochet Stitches Used
- Chain Stitch (ch)
- Double Crochet (dc)
- Slip Stitch (sl st)
- Single Crochet (sc)
Keyhole Scarf Pattern: Step-by-Step Instructions
Start Your Foundation Chain
- Chain 22 (or adjust the number based on your desired width).
First Row – Establishing the Base
- In the 4th chain from the hook, work 1 double crochet (dc).
- In each of the next 18 chains, make 1 dc, leaving the last chain unworked. You should have 20 dc in total.
- Turn your work.
Continuing the Body of the Scarf
- Chain 3 (this counts as your first dc now).
- Make 1 dc in each dc from the previous row.
- Repeat this process for a total of 20 rows or until you reach your desired length, which is typically around 60-70 inches.
Creating the Keyhole
- Once you reach your desired length, turn your work and make 20 chains.
- Count back 10 stitches from the end of the last row, and slip stitch into that stitch to form a loop.
- Chain 10 and slip stitch into the next stitch from the previous row to close the keyhole.
Finishing the Scarf
- To make the ending edge neat, you can work 1 single crochet in each dc across the last row.
- Fasten off by cutting the yarn and pulling it through the last loop. Weave in any ends with the tapestry needle.
Customizing Your Scarf
While the above pattern is a great starting point, there are several ways you can customize your keyhole scarf to make it uniquely yours:
- Color Stripes: Change yarn colors every few rows to achieve a striped effect. Try alternating between light and dark colors or mix solid colors with variegated yarn for a stunning look.
- Textured Stitches: Incorporate various crochet stitches like clusters or shells to add texture. This will not only make your scarf interesting but also enhance its warmth.
- Fringe: Add some fringe to the ends of your scarf for a playful touch. Cut yarn strands to your desired length, fold them in half, and attach them at the ends with a slip knot.
- Embellishments: Sew on some decorative buttons, patches, or even beads along the keyhole for an extra flair.
Care Instructions
To care for your scarf, always check the yarn label for specific washing instructions. Generally, if you are using acrylic yarn, machine washing on a gentle cycle and laying it flat to dry is advisable. For wool yarns, hand washing in cold water and laying flat to dry will prevent shrinkage.

Materials Needed
Before getting started, gather the following materials:
- Yarn: For the scarf, a medium-weight yarn (worsted weight) in your preferred color is ideal. Approximately 200-300 yards should suffice.
- Crochet Hook: A size H (5.0 mm) or I (5.5 mm) crochet hook should work well, but always refer to your yarn label for recommended hook sizes.
- Scissors: For cutting the yarn.
- Tapestry Needle: For weaving in loose ends.
Abbreviations Used
- ch: chain
- sc: single crochet
- dc: double crochet
- sl st: slip stitch
- st(s): stitch or stitches
Step-by-Step Instructions
Making the Foundation Chain
- Start with a Slip Knot: Create a slip knot on your hook.
- Chain 30-40 (or more): The length depends on how long you want your scarf to be. For a typical adult scarf, 35 chains will give you a nice width.
Starting the Scarf
- Row 1: In the second chain from the hook, work a single crochet. Continue to single crochet in each chain across your row. You should have 29 single crochets.
- Row 2: Chain 2 (this counts as the first double crochet), turn your work. In the same stitch, make a double crochet. Then, double crochet into each stitch across the row, ending with one double crochet in the last stitch.
- Repeat Row 2 until the scarf reaches your desired width (approximately 6-8 inches wide).
Creating the Keyhole
- Decide Location: When your scarf is at the desired width, you will need to create an opening for the keyhole. For a typical scarf, this is usually about halfway through.
- Row for Keyhole Opening: To create the keyhole, you’ll form a small gap. Row 1 of the gap should be as follows:
- Chain 2, and then double crochet into the first stitch.
- Leave the next 8 stitches unworked (this will create your gap).
- Double crochet into the next stitch and double crochet across the rest of the row.
- Next Rows: Next, you’ll work additional rows without creating a gap. For this, continue double crocheting until you’ve formed a total length of about 10-12 inches after the keyhole.
Closing off the Scarf and Finishing
- Final Touch: Once you’ve reached the desired length for the part of the scarf after the keyhole, proceed to the end of the row with a final double crochet.
- Last Row: Make a final row of single crochet across the entire scarf to provide a neat finish, which will also stabilize the keyhole area.
- Fasten Off: Cut your yarn, leaving a long tail. Pull the tail through the last stitch to secure it.
Weaving in Ends
Using a tapestry needle, weave in any loose ends from where you began and ended your scarf.
Add Personal Touches
To personalize your keyhole scarf, consider these options:
- Add Fringe: Cut pieces of yarn and attach fringe to the ends of your scarf for some extra flair.
- Decorate: Crochet flowers or motifs separately and sew them onto your scarf as embellishments.
- Experiment with Patterns: Use different stitches (like half double crochet or treble crochet) for more texture.

Conclusion
The crochet keyhole scarf is a fun and quick project that showcases your crochet skills while providing warmth and style. This pattern is an excellent way to explore new stitches and techniques, making it an ideal project for both beginners and experienced crocheters alike. Whether you choose to stick to the basic pattern or add your personal touches, you’ll end up with a beautiful accessory that you can wear with pride.
Now gather your materials and start crafting your very own crochet keyhole scarf today! You’ll not only enjoy the process but will also have a fashionable item to show off or gift to someone special. Happy crocheting!